What Are Android Developer Options?
Android Developer Option is a hidden set of tools within your Android phone that gives users access to advanced settings and features. Originally designed for developers to test apps and debug issues, this option has now become a favorite among tech-savvy users who want more control over their device.
Once enabled, Android Developer Option unlocks a range of functionalities that are not available in regular phone settings. From enabling USB debugging to controlling background processes, changing animation speeds, and even faking your phone’s GPS location — this feature is packed with powerful tools.
But why is it hidden by default? The reason is simple — these settings can directly impact how your device performs. A wrong tweak could slow down your phone, drain battery, or cause apps to misbehave. That’s why Android keeps it locked unless the user chooses to activate it manually.
For bloggers, testers, or anyone who loves exploring the depths of Android, Developer Options can be incredibly useful. You can speed up animations for faster navigation, limit background apps to improve performance, or simulate different conditions to test your own applications. According to the official Android developer documentation, Developer Options are designed to help test and debug apps.
In short, Android Developer Option is like the backstage pass to your phone’s system settings. It’s a toolkit made for those who want to understand their devices better and use them beyond just everyday tasks. Whether you’re optimizing performance or experimenting with new features, this menu offers a unique way to enhance your Android experience — as long as you know what you’re doing.
Why Developer Options Are Hidden by Default
Android Developer Option may sound exciting, but it’s hidden for a good reason. Google designed this feature specifically for developers, not everyday users. By keeping it out of sight, Android ensures that users don’t accidentally change settings that could negatively affect the phone’s performance or stability.
The Android Developer Option includes powerful tools like USB debugging, background process limits, hardware acceleration controls, and more. While these features are incredibly useful for testing apps or customizing device behavior, they also carry risks if misused. For example, enabling mock locations or reducing animation scales might confuse some apps or make the device feel unstable to those unfamiliar with the settings.
To avoid accidental tweaks and unnecessary confusion, Android keeps the Developer Option menu hidden by default. You have to manually unlock it by tapping the build number multiple times — a process that ensures only those who know what they’re doing will access it.
Another reason for hiding it is security. Features like USB debugging can expose your device to threats if connected to untrusted computers. If such settings were easily accessible, users could unknowingly make their devices more vulnerable.
For tech bloggers, testers, or Android enthusiasts, unlocking the Android Developer Option is a choice made with purpose. But for the average user who’s just browsing through settings, hiding it prevents accidental misuse and maintains system integrity.
In short, Developer Options are hidden to protect users and devices. It’s a thoughtful design choice that balances power with safety, ensuring that only those who truly need these advanced features end up using them.
How to Enable Developer Options on Android
Enabling Android Developer Option is simple, but it’s intentionally tucked away to prevent accidental access. Whether you’re a developer, a tech enthusiast, or just curious to explore hidden settings, unlocking it only takes a few steps.
To begin, open the Settings app on your Android device. Scroll down and tap on About phone. Depending on your device brand, this option might be inside System or About device. Now, locate the Build number section — this is the key to unlocking the Android Developer Option.
Tap the Build number seven times quickly. After a few taps, you’ll see a message saying, “You are now X steps away from being a developer.” Once you complete all seven taps, your phone may ask for your lock screen PIN or password. Enter it, and you’ll receive a confirmation message: “You are now a developer!”
Now go back to the main Settings menu. Scroll down to System, and you’ll see a new menu item called Developer Options. On some phones, it might appear directly in the settings list without entering System.
That’s it — you’ve successfully enabled the Android Developer Option on your phone. You can now explore advanced features like USB debugging, animation scale adjustments, mock locations, and more. Just remember, these settings are powerful and should be used wisely.
Enabling Android Developer Option gives you deeper access to your phone’s system controls. Whether you’re testing apps or customizing performance, this feature adds a whole new layer of control to your Android experience.
Top Hidden Features in Developer Options
Once you’ve unlocked the Android Developer Option, a wide range of advanced features become available. These tools are not just meant for app developers — even regular users can use them to improve performance, monitor device behavior, or customize their smartphone experience. Let’s explore the top hidden features inside the Android Developer Option and how each one can be useful.
1. USB Debugging
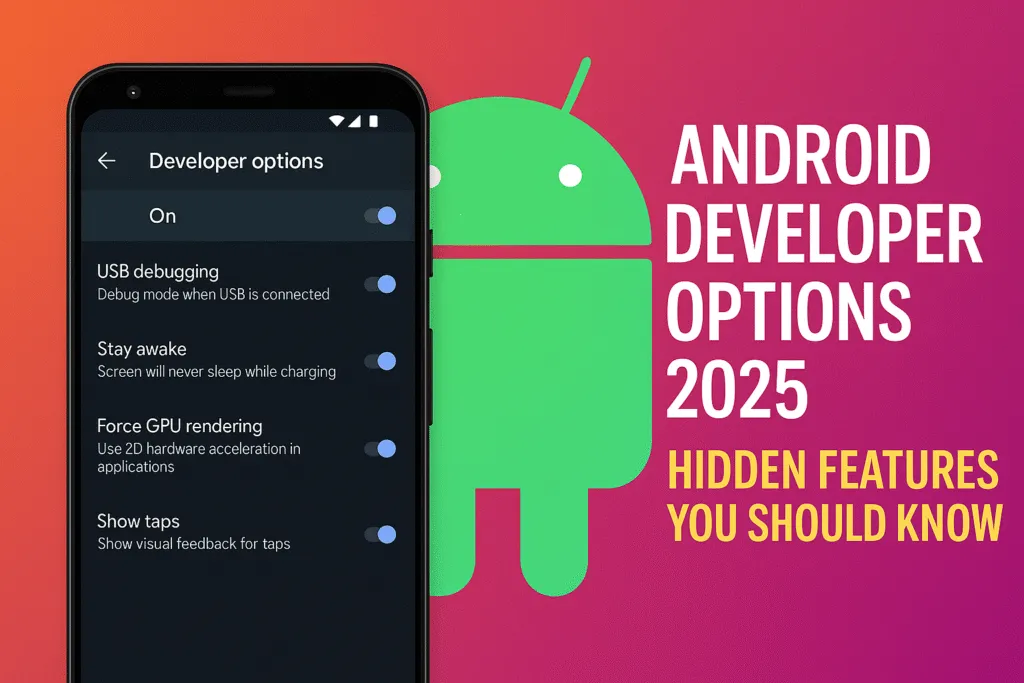
USB Debugging is one of the most popular features in Android Developer Option. It allows your Android phone to communicate with a computer using the Android Debug Bridge (ADB). This is essential for developers testing apps or users rooting their device or installing custom ROMs. It also helps when transferring data via ADB commands or using PC tools like scrcpy to mirror your screen.
2. Stay Awake While Charging
This feature keeps your screen turned on while your device is charging. It’s especially useful during long app testing sessions or when you’re using your phone as a display or control panel. No need to keep touching the screen to prevent it from sleeping — just enable this in the Developer Options.
3. Animation Scale Controls
If your phone feels slow, adjusting the animation scale can give it a noticeable speed boost. With options like Window animation scale, Transition animation scale, and Animator duration scale, you can reduce or turn off animations completely. It doesn’t make your phone faster in processing, but it does make it feel snappier and more responsive.
4. Limit Background Processes
Android apps often run in the background, consuming memory and battery. This feature lets you limit how many processes are allowed to run behind the scenes. You can choose from standard limits to just one background process. It’s useful for older or low-end devices to free up RAM and improve overall performance.
5. Show Touches
When enabled, a small dot appears wherever you touch the screen. This feature is useful for screen recording, tutorials, or app testing. It visually shows where the user is interacting with the device, which can be helpful for debugging UI issues or creating training content.
6. Force GPU Rendering
Android normally decides whether to use CPU or GPU to render UI elements. By enabling Force GPU Rendering, you can make the system use the GPU more often, which might improve performance in some apps with complex graphics. However, not all apps benefit from this, and in rare cases, it may cause glitches.
7. Mock Location App
This feature allows you to set a fake location using a third-party app. It’s commonly used by developers for testing location-based apps, or by users trying to access region-specific content. After installing a mock location app from the Play Store, just select it from this option to simulate any location you want.
8. OEM Unlocking
This is a critical option for those who want to root their phone or install a custom ROM. OEM Unlocking allows the bootloader to be unlocked — an essential step before modifying the Android system. It’s not for casual users, as it may void your warranty or expose the device to risks if done carelessly.
9. Background Check
This setting helps monitor and control which apps are allowed to run in the background. You can identify apps that are draining battery or constantly running without permission. It gives you a more transparent view of app behavior and helps optimize battery usage.
10. Force RTL Layout Direction
For developers creating apps that support right-to-left languages like Arabic or Hebrew, this option forces the entire system to switch layout direction. It’s helpful for testing UI alignment and design for multilingual apps.
These hidden features inside Android Developer Option offer incredible control and customization. Whether you’re a developer testing apps, a tech enthusiast speeding up your phone, or someone just exploring new tweaks, these tools can significantly enhance your Android experience — as long as they’re used wisely.
Benefits of Using Developer Options
Android Developer Option offers a range of advanced features that can significantly improve your overall smartphone experience. While it’s mainly built for developers, many regular users explore it to boost performance, save battery, or customize their device beyond the standard settings.
One of the biggest advantages is performance enhancement. By reducing or disabling animations, your phone feels faster and more responsive — especially helpful for older or budget devices. Small tweaks inside Developer Options can make a noticeable difference in everyday use.
USB Debugging is another widely used feature. It allows your phone to communicate with a computer through ADB (Android Debug Bridge), making it easier to transfer files, mirror your screen, or test apps. This is especially useful for developers and those who like to sideload apps or recover data.
Developer Options also give you more control over background activities. You can limit background processes to save memory and battery or identify apps that are running unnecessarily. Features like Background Check let you manage app behavior more efficiently, leading to better performance and battery life.
For content creators or trainers, tools like Show Touches and Pointer Location are helpful during screen recordings and tutorials. They visually indicate screen interaction, making demonstrations clearer and more professional.
You can also use Developer Options to simulate GPS locations using the Mock Location feature. This is useful for testing location-based apps or exploring services not available in your region.
Advanced users benefit from features like OEM Unlocking, which is necessary if you plan to root your phone or install a custom ROM. Though risky if misused, it provides complete control over your device.
Overall, Android Developer Option isn’t just for coders — it’s for anyone who wants to unlock more potential from their Android phone, as long as they use it wisely.
Risks and Warnings You Should Know
While Android Developer Option opens up powerful features and customization tools, it also comes with certain risks that every user should be aware of. These settings are meant for advanced use, and if misused, they can affect your device’s performance, security, and stability.
One of the biggest risks is enabling options without fully understanding their impact. For example, turning on USB Debugging makes your device more vulnerable when connected to unknown computers. If your phone is unlocked and connected to an untrusted system, sensitive data could be accessed or modified.
Another common mistake is changing animation scale settings or background process limits too aggressively. While these tweaks can make your phone feel faster, setting them incorrectly may cause apps to misbehave, crash, or stop functioning properly. Over-optimization might also lead to a poor user experience if the device starts freezing or lagging.
Enabling features like Mock Location can also lead to issues with certain apps, especially those that rely on accurate location tracking, like maps or ride-sharing apps. Some apps may even flag your phone as modified and restrict access.
OEM Unlocking is another powerful feature, but it carries major risks. Unlocking the bootloader may void your warranty, erase your data, and expose your phone to security vulnerabilities. It should only be used by experienced users who understand the consequences and have proper backups in place.
Additionally, enabling certain debugging tools or system visuals can drain battery quickly or clutter your screen, especially if left on by accident.
In short, Android Developer Option offers great benefits, but only when used with knowledge and care. If you’re unsure about a setting, it’s better to research or avoid it than risk damaging your device or compromising your data. Use these tools wisely to get the most out of your Android experience without putting your phone at risk.
When Should You Disable Developer Options?
While Android Developer Option offers great flexibility and control, it’s not something that needs to stay enabled all the time. In fact, there are situations where it’s better to turn it off for the sake of security, performance, and battery life.
One of the main reasons to disable Developer Options is security. If USB Debugging is turned on and your phone gets connected to an unknown or untrusted computer, it can open the door for data theft or unauthorized access. This becomes especially risky if your device is lost or stolen while Developer Options are active.
You should also disable it when you’ve finished testing or customizing your phone. Many of the tools inside Developer Options are meant for short-term use. Leaving them active unnecessarily — like background limits, animation tweaks, or GPU rendering — may lead to unusual behavior or even slowdowns over time.
Another important time to turn it off is before selling or giving away your phone. Developer Options can affect how the system behaves, and a new user might face issues without knowing the reason. Disabling it ensures the device returns to a safe and stable state.
If you notice battery drain, overheating, or system glitches, and you’ve recently made changes inside Developer Options, disabling it can help troubleshoot the issue. Some settings may keep your phone working harder in the background, using more resources than needed.
Disabling Developer Options is easy — just go to the settings, open Developer Options, and switch the toggle at the top to off. It won’t delete any data or settings, but it will hide the menu until you manually enable it again.
In short, once you’re done using advanced features, it’s a smart move to disable Android Developer Option to keep your phone safe, smooth, and secure.
Who Should Use Android Developer Option?
Android Developer Option is a powerful toolkit designed primarily for developers, but it’s also useful for certain types of users beyond just app creators. However, it’s not meant for everyone. Knowing whether you should use it depends on how comfortable you are with advanced settings and what you want to achieve from your device.
App developers are the primary users of Android Developer Option. They rely on tools like USB debugging, layout bounds, and GPU rendering to test and optimize their apps. These settings help simulate real-world conditions, analyze performance, and identify bugs before an app is released to users.
Tech enthusiasts and power users can also benefit from Developer Options. If you enjoy exploring your phone’s full potential, tweaking animations, customizing behavior, or using ADB commands, these settings offer a deeper level of control. With careful use, you can make your device feel faster, cleaner, and more personalized.
Testers and reviewers often use Developer Options while evaluating apps or devices. Features like show touches, pointer location, and limit background processes help them analyze app behavior, battery usage, and performance under various conditions.
Content creators, such as YouTubers or trainers, also find Developer Options helpful for tutorials or screen recordings. Showing touch points or simulating UI behavior helps create clearer, more educational content.
That said, casual users with no specific goal should avoid using Android Developer Option. These settings are powerful but risky if changed without understanding. Misuse can lead to performance issues, system instability, or security problems.
In short, Android Developer Option is ideal for those who want more control and understand how Android works. If you’re someone who loves testing, learning, or developing, this hidden menu is a valuable tool — but it should always be used with caution.
Final Thoughts: Use With Caution, Use With Purpose
Android Developer Option is like a hidden toolbox that gives you access to powerful features and advanced system controls. It’s not just for developers — tech enthusiasts, testers, and curious users can all benefit from what it offers. Whether you’re speeding up your phone, testing an app, or customizing system behavior, these options can make your Android experience more efficient and personalized.
But with great power comes great responsibility. Many of the tools inside Developer Options can affect how your phone functions. If used carelessly, they can lead to bugs, performance issues, battery drain, or even data loss. That’s why it’s important to explore these settings only when you understand what they do and why you need them.
Always remember that Android Developer Option is not a place for random experimentation. Before changing any setting, take a moment to research its purpose. If you’re just trying to improve performance or test an app, stick to the features you actually need.
And once you’re done using it, don’t forget to turn it off. Disabling Developer Options helps avoid accidental changes and protects your device from potential security risks, especially if USB debugging is enabled.
In the end, Android Developer Option is a powerful asset for those who use it wisely. It opens up more control, more flexibility, and deeper access to your device — but only when used with a clear purpose. If you respect its power and proceed with caution, it can truly enhance how you interact with your Android phone.
Also Read: Canva Pro Hidden Features 2025 That Save Time & Boost Creativity
FAQs About Android Developer Option
1. What is Android Developer Option?
Android Developer Option is a hidden settings menu on Android devices that provides advanced tools for developers and tech users. It includes features like USB debugging, animation control, mock locations, and more.
2. How can I enable Developer Options on my Android phone?
Go to Settings > About Phone > Build Number and tap it seven times. Enter your device PIN if prompted, and Developer Options will appear in the Settings menu.
3. Is it safe to use Android Developer Option?
Yes, it is safe if used carefully. Some settings can affect performance, battery life, or security. Only change what you understand and need.
4. Will enabling Developer Options void my warranty?
No, just enabling Developer Options will not void your warranty. However, using options like OEM Unlocking and rooting your device may void it, depending on your phone brand.
5. What does USB Debugging do?
USB Debugging allows your phone to communicate with a computer for app development, testing, and using ADB commands. It’s useful but should be disabled when not in use for security reasons.
6. Can Developer Options speed up my phone?
Yes, by reducing or disabling animations under Developer Options, your phone may feel faster and more responsive, especially on older devices.
7. What is Mock Location, and why would I use it?
Mock Location lets you fake your GPS location using a third-party app. It’s mainly used for testing location-based apps or accessing region-locked content.
8. How do I turn off Developer Options?
Go to Settings > Developer Options and toggle it off at the top. This will hide the menu but won’t delete any settings.
9. Can Developer Options harm my device?
If used incorrectly, some settings may cause system instability, poor battery life, or app crashes. It’s best to research each feature before changing it.
10. Who should use Developer Options?
Developers, testers, content creators, and tech enthusiasts who understand advanced Android features and need more control over their device can benefit from using it.